Applesauce and Baking Apples

Last year’s bumper crop of apples has led to this year’s apple dearth – there just aren’t that many apples around this year. And here I was all ready for the season too, having purchased an apple picker this past spring and all ready to go “professional”!

Last year, Wild Wise Sooke was posting furiously to see who could pick pears and apples from trees around Sooke so that we didn’t attract the bears into town. My daughter and I picked both kinds of fruit several times – at one location stepping over lots of bear scat – and canned pear and applesauce alone and with two friends on separate occasions to try to keep up with it all. We are still using up some applesauce, actually, from last year’s supply.

This year, not so much. Wild Wise Sooke hasn’t been contacted much by people who have lots of fruit because it’s just not a bumper crop kind of year. A quick search of the Facebook group Sooke Social came up with – thankfully – one person outside of town who had an abundance of apples to sell cheap, and so we dropped by there a couple of weeks ago with the new picker in hand. What she had were lovely, very large, Bramley apples (a variety I had to look up; they’re tart baking apples) and we went away with four cloth shopping bags full after picking for just half an hour. (My daughter loved that she got to climb the tree.)

However, picking apples is one thing…making them into something preserved is another. It takes work! So far I’ve made one batch of canned applesauce, one apple crisp, and one batch of canned baking apples. I’ve also given away one bag of apples to a canning friend. My daughter declared the applesauce the best she’s ever eaten so I’ll be doing 2-3 more batches of that to use up my apple stock and to last us throughout the year. I used this Bernardin applesauce recipe, the Spiced Applesauce variation. There is no hard part about it, it mostly just takes time to wash and prepare the jars, peel, core and cut up the apples, cook the sauce and wait for the 20 minute processing time in the water bath canner.

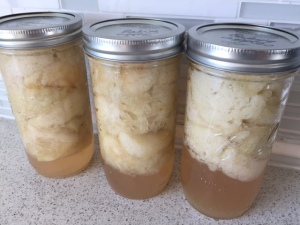
The baking apples (recipe from the Ball Blue Book) were another story. It was partly user error as I didn’t read the recipe quite properly and had to redo one step, but overall these took a lot of time for not much yield. And, as you can see in the picture, I got a bad case of fruit float (even though they looked full when I was filling them) and half the jar ended up as syrup. I’ve never canned apples for baking before so I probably did something wrong, but overall it didn’t seem worth the effort so I don’t think I’ll be doing those again.three jars of baking apples
Applesauce actually saves quite well in the freezer so I might try to save a little processing time and put one batch into medium freezer bags and stow them away in our standup freezer. Just like with any kind of canning, applesauce does take time but I love having it on hand for packing school lunches throughout the year. And it is SO much better than the grocery store-bought option. I’ll just have to put my apple picker into more active use next year!

Chile Salsa (Hot Tomato-Pepper Sauce)

I’ve become a regular at the Goldstream Farmer’s Market in Langford this summer. They don’t have very many food stalls but I’ve been enjoying the ones they have, particularly the people that sell mostly tomatoes. A couple of weeks ago I got a 20lb box of Roma tomatoes for $20 and made a batch of smoky tomato jam and a batch of this Chile Salsa.

Last year I made a big batch of salsa for the winter and we ran out in early spring. I had a recipe from a friend and while we liked it, I had used the immersion blender on it while cooking it and it was a little too runny for our taste. This year I had two goals: 1) Not use the immersion blender, and 2) Find a salsa recipe that we would like even better.

This one from the National Center for Home Food Preservation out of the U.S. seemed intriguing, and the “other” food seller at the Goldstream Market had a lovely variety of peppers in a square basket that I cleaned out when I got to her booth. (I mean the recipe calls for 2 lbs!) I also used some Anaheim peppers that I had leftover in the freezer after buying too many when I made the Tomatillo Green Salsa.

The most awkward thing about making this salsa was attempting to peel the peppers after roasting them. I found that the recipe didn’t really give great instructions for how to do this and it didn’t work the first time so I had to do a quick Google search and do it another way.*

A trick for peeling the Romas after blanching them (which also isn’t mentioned in the recipe) is to cut a little X in the bottom of the tomato while it’s still raw. That way, after you blanch them, the skins will slip off even easier.

This recipe looks beautiful with its variety of colour, and it is hot, just like the title says. I tried some the day of and a few days later, and its hotness seemed to have increased. I think I can handle it…at least I hope so!

I still haven’t made enough salsa to keep us over the winter (I guess we eat a lot of salsa!) so I’m continuing to make other batches with other recipes. I’ll post about those soon! The Goldstream Farmer’s Market is on every Saturday 10-2pm until October 21 (I believe) – see you there.

*I revised the recipe to say, “Wash and dry chilies. Slit each pepper on its side to allow steam to escape. Remove tops, seeds and membranes. Place chilies under broiler for 6-8 minutes each side or until skins blister. Take chilies out of oven and cover with foil. Let sit for about an hour. The skins should peel off easily after that. Chop.”

Pickle Relish

It’s the long weekend and the last thing I want to do is write a blog post. But these images have been staring at me from my desktop for a few weeks now and I wanted to get them up. I did a second batch of relish this summer to try a new recipe. This one is Pickle Relish from the (US-based) National Center for Home Food Preservation.

Maybe you’re eating relish at a bbq somewhere now, on this holiday long weekend! Enjoy.

IMG_2648IMG_2657 IMG_2658 IMG_2660IMG_2652IMG_2659

Hot Dog Relish

I’ve never had a spoonful of relish plain. This is unfortunate because I just made my first batch of relish and, when I come around to tasting it in a week or so, I will have no idea how to tell if it’s good!

I was in Ontario for the last two weeks visiting family and one of the things I did there this past week was make 12 pints of relish with Mom. We had to source the recipe from our old family cookbook because we knew we had a relish recipe, we just couldn’t find it. Mom couldn’t find her copy of the cookbook so my husband sent a photo of the recipe from mine back in Victoria as he was still at home.

We had so many cucumbers! Our original plan was to just make icicle pickles but the half-bushel that Mom ordered turned out to be a heck of a lot of cukes. So we started a crock of pickles and also decided to make relish with the leftovers.

I didn’t take photos as we started so you can’t see what that mound of fresh cucumbers looked like. To the (approximately 24) cucumbers we added 12 onions, 1 jalapeƱo, 4 red peppers and 7 tablespoons pickling salt and let the mixture sit overnight.

In the morning we drained the mixture and added in the rest of the ingredients:


The ingredients we added in the morning were six cups of sugar, three cups of apple cider vinegar and one tablespoon mustard seeds. We also added in a little green food colouring so that the lovely green colour would stay.

We brought this to a boil and then simmered it for 10 minutes:


And jarred the first batch.

This is what the mixture looked like after we took the first six jars’ worth off for the 15 minute processing:


And here are the first six jars cooling on the counter. Among the 12 final jars we only had one not seal, not bad.

We never tasted the relish the day we made it but I did take some home with me to Victoria so I can try it. If it’s good I might make a batch for myself, but not 12 jars’ worth! One thing I might do for my batch is to increase the heat and add more jalapenos. We’ll see.

Thanks to my cousins’ Grandma Ball for this original recipe!

Raspberry Blueberry Jam

Last month I was able to get my hands on some nice raspberries and made two batches of jam: a batch of raspberry and a batch of raspberry blueberry. I haven’t made raspberry jam for ages and since we’re still trying to use up the strawberry jam from last year, I knew it was time to do something different.

This was my second time using a different kind of pectin than the standard Certo that I grew up with and have used for eons. I had seen Pomona’s Pectin in the stores but until this year I never knew what it really was or why a person would use it. Now I’m hooked and will try not to go back to Certo again unless necessary. Pomona’s is the pectin you want if you’re trying to make as natural a jam as possible.

With Pomona’s you use a lot less sugar than you would use with Certo so it’s great for making low sugar jams. It’s a little different because it has two parts: the crystals and something called calcium water. You have to make up the calcium water from a powder that you get in the Pomona’s packet but once you make it up it can last in your fridge for quite some time. It’s not hard to use Pomona’s, it just takes a couple of extra steps.

IMG_2504

This is a shot of the raspberry blueberry jam boiling up in my stockpot. (I hate getting hot jam splashed on me so try to use a tall-sided pot when I think that might happen!)

IMG_2505

And these are jars of the two different kinds of jam waiting to be taken down to my canning rack in the basement.

IMG_2507

This was also my first time making the raspberry blueberry combination and I’m excited to see how it turns out. I think it might be a great and flavourful jam for making jam bars at some point but I have some of last year’s jam stores to use up in that way first. I certainly don’t eat a ton of jam but since we still have a small person in the house, homemade jam is still a “must do” on my summer canning list.